How To Install Jeep Lift Kit: A Beginners Guide (Gladiator & Wrangler)
- Muddy Ruttzz
- Jul 25, 2024
- 11 min read
Updated: Feb 2
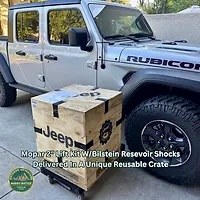
Our Gladiator Rubicon Ecodiesel was bottoming out on the Bump Stops. I had put on a steel bumper and winch, causing the stock Rubicon Fox Shocks to struggle with the extra weight. While it was somewhat disappointing, it provided a perfect opportunity to enhance the suspension. I opted for the Mopar 2" Lift Kit With Bilstein Remote Reservoir Shocks.
Muddy Ruttzz Youtube Channel
My are unsponsored and gear you see I use in my outdoor adventures.

Support Us! Muddy Ruttzz earns a commission from ✅ affiliate links in this article. Learn More
Is Installing a Jeep Lift Kit in a Driveway Possible? I Spent 3 Days in Mine
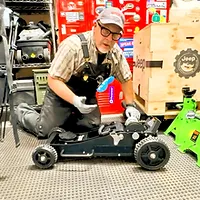
Let’s be real: tackling a project this intense solo is a marathon, not a sprint. I spent three full days in my driveway getting this kit dialed in, and while doing the work and filming by yourself definitely stretches the timeline, it is absolutely doable for a beginner. This video isn't a "by-the-book" technical manual, but rather a real-world look at what it’s actually like to be under the Jeep when you’re the head mechanic and the camera crew. If you’re wondering if you have the grit to take on a Jeep lift kit installation yourself, watch how I managed the hurdles. In the end, every sore muscle was worth it—the Gladiator is out of the garage and running like a dream!

Collectable Crate Packed With Lift Kit Components
The Mopar Kit is all about giving your Jeep that extra edge with some seriously cool components. They've got a kit for pretty much every vehicle and engine combo out there. Each coil spring and shock comes with its own part number that matches up with a specific corner of your Jeep, which is pretty neat! Plus, Jeep totally gets that sometimes you want to lift your ride. That’s why stock Jeep Wranglers and Gladiators come with an extra 2 inches in the brake lines, electrical lines, and differential breather tubes. So, you’re all set for a little adventure!
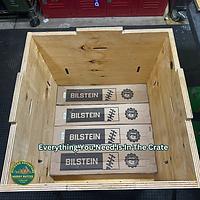
Parts Checklist: What’s Inside the Mopar Bilstein 2" Lift Kit?
Before you dive into the install, it’s essential to lay everything out. Here is the complete breakdown of what comes in that iconic wooden crate:
Front Shock Absorbers (2): Featuring remote reservoirs and all necessary mounting hardware.
Rear Shock Absorbers (2): Reservoir shocks with brackets and hardware for piggyback mounting.
Progressive Coil Springs (4): Two front and two rear springs, position-matched with individual part numbers for precise fitment.
Lower Locating Collars: Two new collars for the front springs (original rears are reused).
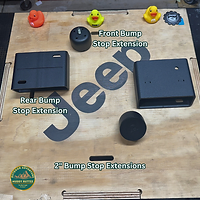
Bump Stop Extensions: Two front and two rear extensions to accommodate the increased travel.
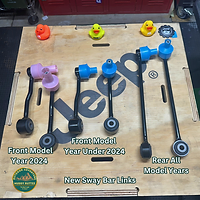
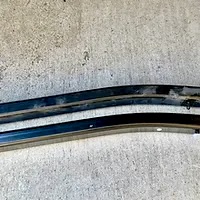
Extended Sway Bar Links: Includes longer links for both front and back. Note: The kit includes two sets of front links to cover different model year changes.
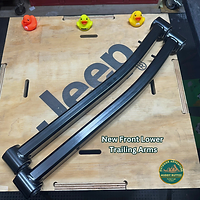
Front Lower Control Arms (2): Upgraded arms to maintain proper caster and geometry.
Jeep Trail Rated Badge: A nice aesthetic touch to replace or add to your fender.
Collectible Wood Parts Crate: The reusable crate itself—perfect for garage storage or as a piece of Jeep memorabilia.
Pro Tip: Inventorying these parts on day one saved me a lot of headaches. Make sure you check those coil spring part numbers—they are position-specific, and you don't want to swap them by mistake!
There's just something super exciting about cracking open your parts crate and seeing what goodies are inside! If you're looking to lift your Jeep, you’ll need a few essentials: new coil springs, shocks, control arms, bump stop extensions, sway bar links, and of course, some installation instructions. I put together an unboxing video—kind of like a show and tell—so you can check out all the awesome parts in the cool Mopar parts crate. You can watch that video right here on YouTube.
Related Content

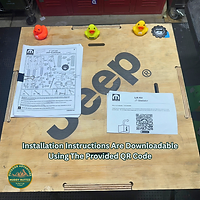
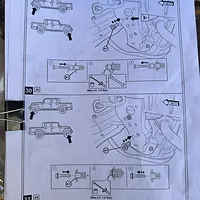
Download The Installation Instructions That Mopar Has Made Available link
You know, I wasn’t really familiar with front end components, so I had to take my time reading through the instructions to get a handle on things. Honestly, they felt more like a guide for a mechanic who could read between the lines based on their experience. Since I didn’t have any background with this kind of project, it was a bit of a challenge. But hey, if I ever decide to install another lift, I’d definitely tackle it differently now that I’ve learned a thing or two!
One thing I will say is verify the torque specifications because they left much to be desired. Correct torque is essential for both performance and safety.
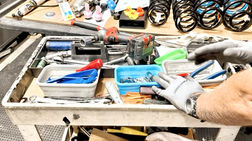
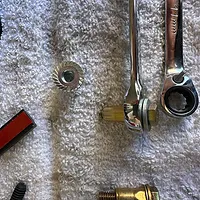
Tools Required for a DIY Jeep Lift Kit Installation
I own lots of tools but I needed to buy more. The money I saved installing the kit myself I spent buying tools. I just about broke even.
Tools You Likely Already Have
Metric wrenches & sockets (up to 24mm)
Allen wrenches
Impact driver
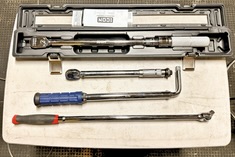
Special Tools You May Need To Buy
High-Range Torque Wrench: Must reach at least 200 lbs (Control arms require 185 ft-lbs).
High-Lift Floor Jack: Needs enough travel for a lifted vehicle.
Heavy-Duty Jack Stands.
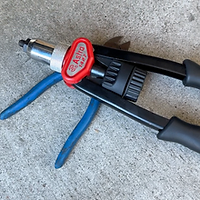
Rivnut Tool: You will need to install some rivnuts or nutserts in the frame for the brackets that hold the front reservoir on. It is much easier with a actual rivnut tool but doable with wrenches.
Strap Wrench - Installing the front bump stop extensions was a nightmare that I was only able to accomplish with a strap wrench that I had in my tool box for years and never used. It saved the day for me.
This list is not by any means complete.


Step-by-Step: How to Install Your Jeep Lift Kit
Step 1: Safety and Preperation
Double locking jack stands are the only ones to use and I make sure to place the removed tire under the vehicle for added safety in case the vehicle falls. Glove protect your hands and safety glasses protect your eyes. (Safety Tips)
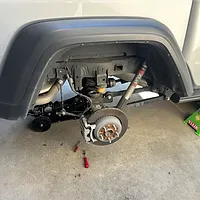
Step 2: Front Axle Disassembly
Dismantling the Original Suspension Parts: Getting Ready to Install New Suspension Components. To start, unplug the Differential Electric Connector, free up the additional 2 inches of Brake Line included in the Jeep, and detach a clip from the Diff Breather Tube. Afterward, you'll be able to safely remove the sway bar link, shock, and lower the axle without causing any harm to them.
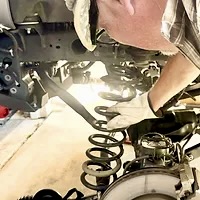


Using Jacks to Support Both Sides of the Front Axle
Having a jack on each side of the solid axle serves to protect the drive shaft and other components from damage. This setup also enables you to adjust the axle by raising and lowering each side as required, which is essential for removing and installing coil springs. A Jack That Goes High Enough To Lift A Lifted Vehicle
Step 3: Installing New Lower Control Arms and Progressive Springs
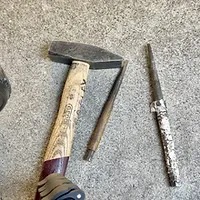
When compared directly, as shown in the first picture above, the new Lower Control Arms don't seem significantly different from the stock ones. Ensure that you have already loosened the bolts that connect the Axle Side and Frame Side. By utilizing the jack to raise and lower the axle, along with my drift pins and hammer, I could easily align the holes and attach the bolts.
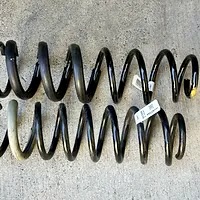

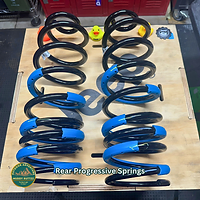
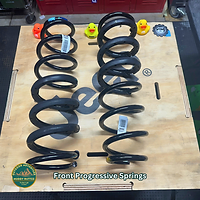
The new coil springs are progressive, unlike the old ones which may not be. Additionally, the new springs are 2 inches longer due to the 2-inch lift. Progressive springs become firmer as they compress more, while still offering a relatively comfortable ride.
You have to reuse the upper coil spring isolators. I secured them in place using blue painters tape during the spring installation. Double-sided tape was used on the rear (better idea.) The fourth picture illustrates the process of installing the spring. Remember to insert the new Bump Stop Extension into the coil before installing the spring.
Hit A "Bump In The Road" Installing The Front Bump Stop Extensions
Front Bump Stop Extensions turned into a nightmare to install. Seriously, I thought I was assembling IKEA furniture blindfolded! It was so bad, I had to create this separate video just to explain it—because if I didn’t, I might have ended up in a witness protection program for tools gone rogue!
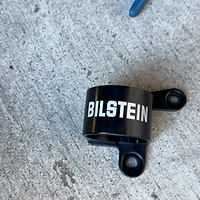
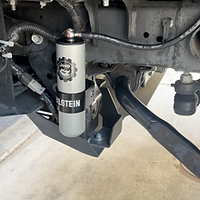
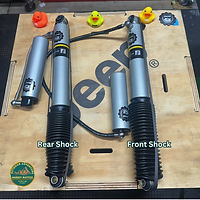
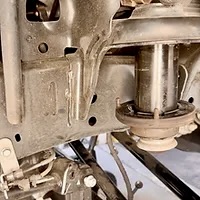
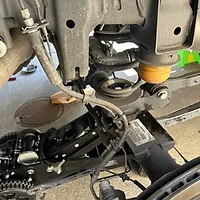
Step 4: Mounting Bilstein Remote Reservoir Shocks
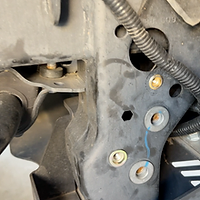
Note On Installing The Bilsteins Shock Reservoir On The Frame: Encountered a further setback during the installation of the bracket for the Shock Reservoir on the frame. The kit is designed to use existing holes. However, one of the nutserts provided was too small for the designated hole in the frame. After searching through my collection of rivnuts, I managed to find only 2 of the appropriate size. I used my rivnut tool to set them in place and finished the installation successfully.

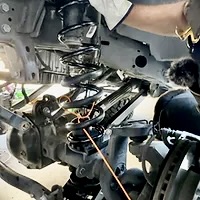
Step 5: Rear Suspension Installation
Once the Gladiator has been lifted and placed on stands, the next step is to loosen the bolts securing the track bar, upper control arms, and lower control arms. Support the rear axle on both sides, then proceed to remove the stock springs, sway bar link, and shocks.
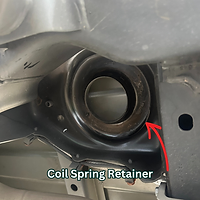
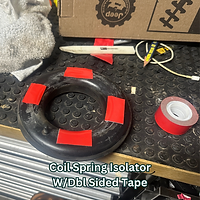
In the Gladiator, the Rear Coil Spring is positioned within the Coil Spring Retainer at the top. The Rubber Coils Spring Isolator is retained for reuse. This component serves to avoid direct metal contact, provides cushioning for the spring, and ensures correct positioning.
Installing the new spring and holding the isolator simultaneously is not feasible. To overcome this challenge, I resolved the issue by utilizing double-sided tape to secure it in position. Upon closer inspection, you will notice the rubber pin that aligns with a hole on the retainer to ensure correct placement.

The New Progressive Rear Spring
New spring is stout looking and it is easy to see the tightly wound coils at the top that make it progressive.

Removing and Hanging The Brake Caliper
In order to lower the rear axle sufficiently to install the new longer coil spring, I needed to take off the brake caliper. Otherwise, the brake lines would have been too taut.
New Coil Spring Installed
After lowering one side and raising the other side the the axle I was able shoe horn the new spring in using a flat bar.

Ready To Install The New Bilstein Shock
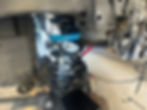
Rear shock reservoir piggybacks on to the shock with a nicely made aluminum bracket.

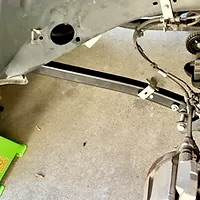
2" Bump Stop Extension Bolts On To The Existing Bump Stop
The black rectangle in the photo is the new bump stop extension.

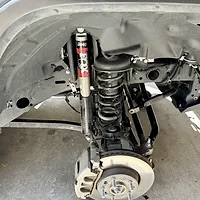
Installation Complete: Looks Totally Awesome
New coil spring, Bilstein Shock, sway bar end link and bump stop extension installed on passenger and driver side of Gladiator.

Step 6: Final Torquing and Alignment
After putting the tires back on and lowering the Jeep Gladiator to the ground, I can now begin retightening all the bolts that I had previously loosened. Some of the bolts require a torque of 185 foot pounds. I had to buy a longer 1/2" drive wrench to provide more leverage. The blue cam strap is holding my backup wrench freeing up both hands to tighten the bolts.
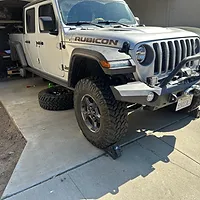
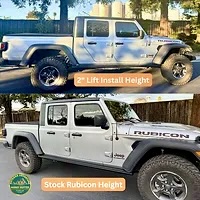
Alignment: Took the Gladiator for a ride and it drove pretty well although the steering wheel was not longer centered. No problem, it was going to my local 4X4 shop for a alignment. After alignment the Gladiator just felt like a whole new vehicle. Huge upgrade from the stock Fox Shocks that came on the Rubicon model Gladiator.
Instruction manual had a page with new alignment specs. According to the shop they were not for this truck. Fortunately they knew the proper specs.
Muddy Ruttzz Pro-Tip:
Always do your final torque-down with the Jeep on the ground under its own weight. If you tighten your control arms or track bar while the Jeep is still on jack stands, you’ll 'bind' the rubber bushings. This leads to a harsh ride and premature wear. Save the final clicks of the torque wrench for when the tires are back on the pavement!
A Quick List Of Steps Required To Install A Lift Kit On A Jeep Gladiator Or Wrangler JL
Jack up the vehicle and set it safely on jack stands or a lift
Remove tires
Loosen Track Bar and Control Arm Bolts
Remove electrical connectors on differential and remove zip ties from brake and electrical lines to free extra 2" Jeep provides.
Remove stock components
Install new components
Re-attach electrical connectors
Re-install tires
Re-torque all bolts that were loosed to Mopar specs
Test drive and get a alignment
Enjoy your lifted Jeep

Post-Install: The 2,550-Mile Test Drive
Lift kit installed, we hooked up our Xventure XV-3 and drove from Norther California to Las Cruces New Mexico. Awesome performance. Jeep just felt so much better.
Conclusion:Was The DIY Install Worth It?
The Verdict on the Mopar Bilstein 2" Lift
After over 2,500 miles of testing—from the highways of Northern California to the dusty trails of Las Cruces—the verdict is in: the Mopar Bilstein Lift is a game-changer for the EcoDiesel Gladiator. By restoring the geometry and adding progressive springs, the Jeep no longer sags under the weight of my Warn winch and bumper.
If you're tired of hitting your bump stops and want a "factory-plus" ride quality, this kit is the answer. It’s a labor-intensive DIY, but it’s a project that pays dividends every time you air down for an adventure.
Don’t forget to subscribe! If you want to see this lift kit in action on the trails of New Mexico, head over to the Muddy Ruttzz YouTube Channel and hit that notification bell. Let’s get out there and get muddy!
Merch Section
Support Me in Producing Quality Content. Use My Links to Buy These Amazing Products. I will get a small commission when you do. (No extra cost to you.)
Amazon Shopping
✅ - Mopar Bilstein Lift Kit Delivered In Collectible Crate - Be sure to order the proper lift kit for your vehicle/engine combination (Amazon)
✅ - Everything For Jeeps Here (Amazon)
✅ - Amazon Purchases - Use This Link To Shop For Anything On Amazon
Ebay Shopping
✅ - Leatherman Multi Tools Made In USA (eBay)

Muddy Ruttzz Website Merch Page Click Here!
✅ - Zarges Aluminum Cases - Best Made Overlanding Storage Cases. When you require the best protection for you gear. Bear Resitant available. (Zarges)

✅ - MERCH - Great Muddy Ruttzz Clothing.
Click Here to See my Zarges Blogpost.
As a Amazon Affiliate and Ebay Partner I receive a commission if you use my links to make a qualifying purchase. It does not raise the price you pay.


