Jeep Wrangler JL & Gladiator: Upgrading to Synergy Ball Joints and Knuckles

Updated: Aug 28
Affiliate Disclosure: This post is unsponsored, I don't take products for free to do reviews on them. To support the studio, I use affiliate links from Amazon and eBay. If you click and purchase, I may earn a small commission at no extra cost to you
📌 TL;DR / Quick Summary
The Factory Vulnerability: Stock Jeep Wrangler JL front ends rely on plastic-lined OEM ball joints and lightweight 7 lb cast-aluminum knuckles that risk failure on tough trails.
The Heavy-Duty Upgrade: In this build installment, we tear the front end down to the axle "C"s to install rugged Synergy ball joints and massive 22 lb heavy-duty ductile iron steering knuckles.
Step-by-Step Guidance: Get the complete teardown sequence, loaner tool press setups, critical torque specs, and essential bushing warnings to ensure a bulletproof installation.
What You Will Learn In This Post
We are diving into why factory plastic-lined ball joints and aluminum knuckles just can't cut it on a serious off-road Jeep build. These two vulnerable components can leave you stranded miles from help, but a Saturday in the garage easily solves the problem. Once the upgrade is done, our rig is dialed in for bigger tires and tougher trails.
In this step-by-step walkthrough, you will learn how to properly disassemble your Jeep JL front driver-side assembly, protect your inner axle seals, and use loaner press kits to remove stubborn factory joints. We will also cover:
Why replacing factory aluminum knuckles with heavy-duty iron components is essential for off-road durability.
The exact orientation and press technique required for greaseable, heavy-duty ball joints.
Critical torque values, single-use hardware warnings, and assembly tricks that prevent voiding component warranties.
Links to the matching Youtube video timestamps are at the bottom of each section.
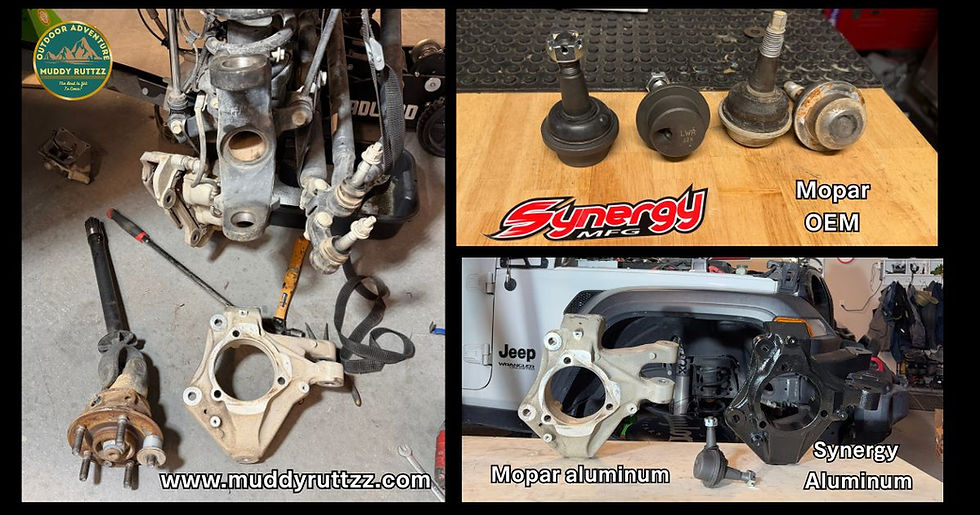
Hidden Weakness in Stock Jeep Front Ends: Synergy Ball Joints and Knuckles Are the Cure
Steering knuckles weren't even on my radar. I had already installed Dynatrac HD ball joints on our EcoDiesel Gladiator, and since it came with OEM iron knuckles, I figured my Wrangler Willys EcoDiesel would too. But once I pulled the wheel to start the Synergy ball joint install, I saw aluminum staring back at me. I went straight to eBay and ordered a set of Synergy heavy-duty iron knuckles. Stock plastic-lined joints and weak knuckles have no place on a "Willys Rubicon Killer" build, and with 440 ft-lbs of diesel torque on tap, a little extra cast-iron weight was a non-issue.
Component Comparison | OEM Factory Spec | Synergy Heavy-Duty Upgrade |
Knuckle Material | Cast Aluminum | High-Strength Ductile Iron |
Knuckle Weight | Approx. 7.0 lbs | Approx. 22 lbs 2 oz |
Ball Joint Design | Plastic-lined, non-greaseable | Fully greaseable, metal-on-metal design |
Trail Suitability | Stock tires / Light duty | 35"+ tires / Hardcore rock crawling |
A 15-pound difference in cast metal per side reveals the sheer strength advantage of upgrading to iron. If you plan on tackling difficult obstacles, ditching the stock aluminum knuckles and fragile joints is mandatory.

Essential Tools and Workshop Preparation
Before tearing into your front axle, having the correct specialty tools on hand ensures a smooth job without unexpected trips to the parts store:
Ball Joint Service Kit: EverTough Press Kit (#67050) & 4WD Adapter Set (#67048)
Sockets & Wrenches: 21mm socket (caliper bolts), 13mm 6-point & 12-point sockets (unit bearing bolts & speed sensor bracket), 10mm socket (dust shield), 5mm Allen socket (wheel speed sensor), and T30 Torx bit (rotor retaining screw).
Torque Wrench & Crow's Foot Wrench: For properly torquing tie rods and castle nuts.
Chemicals & Lubricants: Blue Loctite, Red Loctite, high-temp anti-seize, clean gear oil, and machine oil for the press jack screw.
Safety & Shop Gear: Caliper hanger hook, dead-blow hammer, BFH (large hammer), wood block, and Scotch-Brite/fine emery cloth.

Step-by-Step Front End Disassembly
Careful disassembly protects sensitive electronic and mechanical components that are reused during reassembly.
Front End Teardown Sequence:
[Tie Rod End] ➔ [Brake Caliper & Rotor] ➔ [Dust Shield & Wheel Speed Sensor] ➔ [Unit Bearing & Axle Shaft] ➔ [OEM Steering Knuckle]
1. Removing Tie Rods, Calipers, and Rotors
Loosen and disconnect the tie rod end from the steering knuckle and support it out of the working path using a strap.
Use a 21mm socket on a breaker bar to break loose the two brake caliper mounting bolts. Hang the caliper securely with a metal hook—never let a brake caliper hang by the rubber brake hose.
Remove the small rotor locating screw using a T30 Torx bit. If the rotor is stuck, strike it between studs using a dead-blow hammer to release surface rust without damaging the braking surface.
2. Disconnecting Wheel Speed Sensors and Axle Shafts
Remove the brake dust shield using a 10mm socket.
Carefully remove the delicate wheel speed sensor bolt with a 5mm Allen socket, followed by the 13mm bracket bolt. Secure the sensor wiring safely away from the axle "C".
Remove the three unit bearing bolts using a 13mm 6-sided socket.
Gently pull the unit bearing, U-joint, and axle shaft out as a single assembly. Always support the axle shaft horizontally during removal to prevent damaging the inner axle seal inside the axle tube.
3. Stripping the Factory Aluminum Knuckle
Pull the factory cotter pins from both the upper and lower ball joint castle nuts.
Remove the upper castle nut completely.
Loosen the lower castle nut several turns, but leave it threaded on the end of the lower joint stud. This prevents the steering knuckle from flying off when struck.
Strike the knuckle boss sharply with a large hammer to unseat the tapers. Retrieve the factory tapered split bushing that drops out from the upper mount—this part is critical for installing your new knuckles.

Removing Weak OEM Ball Joints with a Ball Joint Press
Removing press-fit factory joints from the Jeep JL axle "C" requires a specific order of operations:
Lube the Press: Apply clean motor oil or grease to the forcing screw of the ball joint press to reduce friction and wear on the threads.
Top Joint Out First: On Jeep Wrangler JL axles, always press out the top ball joint first. The forcing screw of the press must pass through the empty upper bore hole to press the lower joint out downward.
Tape Your Adapters: When juggling heavy cast C-clamps and press cups, taping the receiver tubes together keeps the setup aligned while you tighten the forcing screw.
Bore Hole Prep: Once both joints are removed, inspect the axle "C" bores. Clean away all rust, scale, and burrs using fine emery cloth or a Scotch-Brite pad to ensure the new joints press in completely true. Run a clean rag through the axle tube to sweep out any accumulated debris.

Step-by-Step Synergy Ball Joints Installation
Proper alignment is critical when pressing heavy-duty replacement joints into the axle housing.
Synergy Press-In Sequence:
[Clean & Anti-Seize Bores] ➔ [Lower Joint (Grease Fitting Rearward)] ➔ [Upper Joint (Square & Aligned)] ➔ [Thread Grease Zerks]
1. Preparing and Aligning the Joints
Apply a thin coat of anti-seize lubricant inside the clean bore holes. Synergy HD ball joints are distinct: ensure the joint labeled LOWER is used in the bottom bore, and the joint labeled UPPER is used in the top bore.
2. Pressing the Lower Ball Joint
Set the lower ball joint into position from underneath the axle "C".
Critical Alignment: Ensure the grease zerk port on the lower joint points toward the rear of the vehicle to maintain clearance from moving steering linkages and axle components.
Use the proper adapter from the 4WD adapter set so force is applied strictly to the outer flange of the joint housing.
Slowly tighten the press, checking constantly that the joint enters the bore perfectly square. Tighten until the joint flange sits flush against the bottom of the axle "C".
3. Pressing the Upper Ball Joint
Position the upper joint into the top bore.
Press the joint into place straight and true using the matching press cup adapter. Note: A slight raised lip on the upper housing flange is normal for this specific design.
Align the cotter pin hole on the upper stud so it sits perpendicular to the axle centerline.
Thread the grease fittings into both joints and wipe away any excess anti-seize.

Installing the Synergy Heavy-Duty Iron Steering Knuckle
Installing heavy iron knuckles requires following the manufacturer's exact torque and seating sequence to avoid damaging internal ball joint components.
Torque & Tightening Sequence:
1. Thread Lower Castle Nut loosely with washer
2. Pre-torque Lower Nut to 22 ft-lbs
3. Insert Tapered Bushing (Match flat internal profile)
4. Drive Knuckle UP using hammer/wood block (Do NOT pull with nut!)
5. Torque Upper Castle Nut to 55 ft-lbs (Advance to align cotter pin)
6. Final Torque Lower Castle Nut to 48 ft-lbs (Install cotter pin)
⚠️ CRITICAL INSTALL WARNING:
Never use the upper ball joint castle nut to pull the tapered split bushing into the steering knuckle. Doing so forces the joint stud upward against its internal seat, damaging the component and voiding the manufacturer's warranty. Seat the knuckle fully upward using a hammer and a block of wood before torquing the upper nut.
Upper Castle Nut Final Torque: 55 ft-lbs
Lower Castle Nut Final Torque: 48 ft-lbs
Note: If the cotter pin holes do not line up with the castle nut slots at full torque, always tighten the nut further to align the hole. Never loosen a suspension castle nut to fit a cotter pin.

Front Axle Reassembly & Master Torque Spec Chart
With the heavy-duty knuckles and joints secured, reassemble the remaining front-end drive components.
Reassembly Sequence:
[Anti-seize Knuckle Bore / Lube Splines] ➔ [Guide Axle Shaft] ➔ [Torque Unit Bearing] ➔ [Install Sensor & Steering Stop] ➔ [Torque Tie Rod]
Axle Shaft: Coat the unit bearing contact face of the knuckle with anti-seize, and apply clean gear oil to the axle splines. Carefully guide the splined shaft through the knuckle and inner seal until the splines mesh smoothly with the differential carrier side gears.
Unit Bearing: Ensure the speed sensor port points toward the front of the vehicle. Apply Blue Loctite to the three 13mm bolts and torque them evenly to 75 ft-lbs.
Speed Sensor: Reinstall the speed sensor bracket bolt (13mm) and sensor bolt (5mm Allen) using Blue Loctite. Tighten the small 5mm bolt carefully by hand to prevent stripping or breaking the fastener.
Steering Stop Spacer: Apply Red Loctite and torque the steering stop bolt to 20 ft-lbs.
Tie Rod End: Reattach the tie rod end using a new single-use lock nut. Back up the spindle stud with an Allen key and torque the nut to spec using a crow's foot extension positioned 90 degrees out from your torque wrench.
Essential Torque Specifications
Fastener / Connection | Torque Spec | Threadlocker Required |
Lower Ball Joint (Pre-load step) | 22 ft-lbs | None |
Upper Ball Joint Castle Nut | 55 ft-lbs | Cotter Pin Secured |
Lower Ball Joint Castle Nut (Final) | 48 ft-lbs | Cotter Pin Secured |
Unit Bearing Mounting Bolts (3x) | 75 ft-lbs | Blue Loctite |
Steering Stop Spacer Bolt | 20 ft-lbs | Red Loctite |
Brake Caliper Anchor Bolts | Factory Spec (~148 ft-lbs) | Blue Loctite |
Conclusion: Final Thoughts: Building a Trail-Ready Rig
Upgrading to greaseable Synergy HD ball joints and 22 lb ductile iron knuckles replaces weak, plastic-lined factory components with bulletproof trail hardware. This driver-side installation provides the durability and confidence needed to tackle tough, technical terrain without fear of front-end failures.
Note for DIYers:
The passenger side involves the Front Axle Disconnect (FAD) system, which requires a specific axle alignment procedure to ensure the shift collar slides into place correctly. Check out our dedicated guide and video covering the Jeep JL FAD system before tackling the passenger-side axle!
Next Video in this series I DIY install a set of awesome front brakes and do a one man brake bleed. Link directly below:
Subscribe to the channel and check the Muddy Ruttzz Gazette for more articles and build updates!
Muddy Ruttzz is a digital creator, overlander, and DIY enthusiast who documents rugged outdoor adventures and the gear that makes them possible through the Muddy Ruttzz brand. With a multi-decade background in industrial sheet metal fabrication, heavy infrastructure construction, and mechanical problem-solving, he brings a straightforward, hands-on trade perspective to technical builds, vehicle modifications, and digital workflow optimization.
Merch Section
Use these links to support Muddy Ruttzz - you don't have to buy the listed product, I will get credit for anything you purchase.
Shopping on Amazon
Shopping on eBay
Synergy HD Ball Joints (eBay)

✅ - Zarges Aluminum Cases - Best Made Overlanding Storage Cases. When you require the best protection for you gear. Bear Resitant available. (Zarges)

✅ - MERCH Availabe on Spreadshop - Awesome Original Design Shirts and Merch - Muddy Ruttzz Clothing.
Click Here to See my Zarges Blogpost.
Affiliate Disclosure
As a Amazon Affiliate and Ebay Partner I receive a commission if you use my links to make a qualifying purchase. It does not raise the price you pay.

Purchase On Amazon 
Purchase On Amazon 
Purchase On Zarges Website 
Purchase Case On Zarges Websit


