Mopar Jeep Trailer Brake Controller: DIY Install in 17 Steps (JL/JT)
- Muddy Ruttzz
- Jan 23, 2025
- 10 min read

Updated: Oct 27, 2025
To Operate Electric Trailer Brakes, a Trailer Brake Controller Must Be Installed
Towing trailers can be a bit of a challenge, even if you’ve been driving for years. Most trailers, except for the really small ones, come with some kind of braking system. Smaller ones usually have electric brakes, while the bigger ones might use air brakes. In this article, we’re focusing on electric brakes. If you’ve got a 7-pin connector, it can send a signal to activate those electric brakes. Just keep in mind that your tow vehicle needs to have a trailer brake controller installed to get those brakes working properly.
Muddy Ruttzz Youtube Channel
Check Out My Youtube Video On This Subject Here
Support Us! Muddy Ruttzz earns a commission from ✅ affiliate links in this article. Learn More

✅ Purchase This Brake Controller On Amazon

The Mopar Trailer Brake Controller: Exact Fit And Plug And Play Compatible With The JT And JL
So, I've got a bit of a thing for Mopar parts. They just fit like a glove, and I love knowing they've been put through the wringer testing by the manufacturer. This is actually my second install—first one was on my 2020 Wrangler, and it went so smoothly that I couldn't resist getting another kit for my Gladiator. Excited to see how this one turns out!
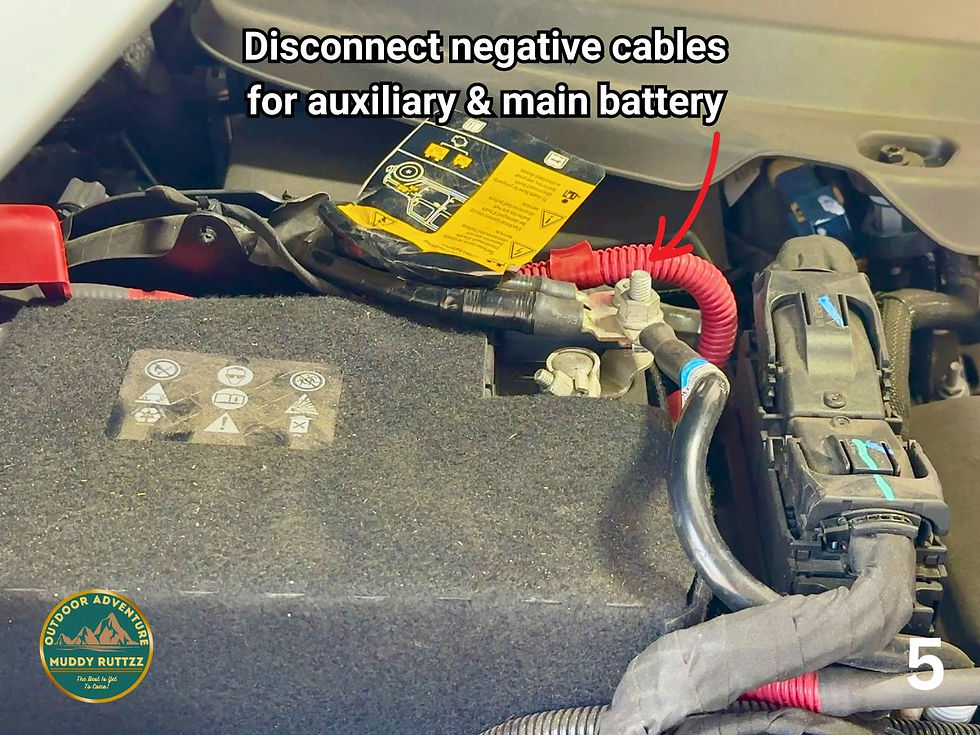
Crucial and Most Essential Step in This Installation: If You're Uncertain About This, Hire a Professional to Install It for You
Let’s chat about keeping yourself and your ride safe. I’ve spent a good chunk of this article diving into how to disconnect the battery on your Jeep. Trust me, it’s super important! When I did my first trailer brake install on my Wrangler, I thought I was all set after disconnecting the battery cables. Little did I know, my Jeep has both a stop/start battery and a main battery, so I still had power running through. Ever since then, my radio has been a bit wonky with keeping time, but honestly, I haven’t noticed any other issues. Who knows, maybe it’s just a coincidence!

Batteries must be disconnected prior to working on electrical components.
Wait 20-30 minutes after turning the vehicle off and closing the doors to disconnect.
The Jeep has 2 batteries that need to be disconnected.
Seek help from a qualified mechanic to avoid damage to vehicle and injury to yourself and others.
Letting The Vehicle "Go To Sleep" Prevents Damage To Delicate Electrical Systems
Close the doors and wait 20-30 minutes for the vehicle to go to "sleep." This is something I recently learned in my research prior to undertaking this project. Here is a link article explaining why it is important. The importance of properly disconnecting vehicle batteries for collision repairs.
WARNING: Critical Importance of Properly Disconnecting Vehicle Batteries
It is imperative to understand the correct procedure for completely disconnecting the batteries in your vehicle. Failure to do so may result in unintended activation of electrical systems, posing significant risks to both personal safety and vehicle integrity. Ensure that all systems are fully de-energized before proceeding with any maintenance or repairs. On my Jeeps I disconnect the negative battery leads and the ground wires on the body ground studs. Check your manual, ask a professional or have a professional mechanic do the work if you are not sure.
This is a short video I made disconnecting my Jeeps Battery:


Related Content
I Hate Removing Dash Components, Door Panels And Any Other Parts Held On By Plastic Clips!

There are 2 separate dash components need to be removed to install the controller


Removing The Lower Center Control Cluster Allows To Back Of 12 Volt Outlet That Needs To Be Removed
I didn't have the special tool needed to remove the 12-volt outlet, so I ended up taking it apart piece by piece. In essence, I destroyed it to remove it, but fortunately, I didn't damage the dashboard. There's a better method, but I'm not sure what it is. I've heard that the special tool sometimes doesn't work anyway. One thing is certain: the task wouldn't have been completed if it hadn't been removed.


The Bezel Snaps Right In And The 2 Small Tabs Are Positioned at 12 O'clock or Top Dead Center


First Part Of This Trailer Brake Controller Is Installed
We tackled the whole dashboard removal and reinstallation process, and let me tell you, it was quite the adventure! We ended up destroying a 12-volt connector along the way, but we managed to get our new trailer brake controller parts installed. It was a bit tedious, but honestly, it wasn’t that tough. Just a lot of back and forth!

This Is Where The Fun Begins! Much Easier If You're Small, Thin, and Young: I Am None Of Those! But Hey, At Least I’m Not a Couch Potato—More Like a Couch Sweet Potato!
I took off the strap and harness connector off the Jeeps door, opened it all the way and pushed my seat all the way back to give myself as much room as possible to get to the location where the module gets installed. Even with all that, I ended up doing most of the work one-handed and without really being able to see what I was doing. But hey, I did manage to stick my camera up there and got some pretty decent video of what was going on!

Removing A Push Pin Zip Tie: The Hardest Part Of This Install
So, there are two bolts that keep this module nice and snug. One of them is super easy to find—just look for a frame hole, and you’re golden. But the other one? Total headache. The harness for the tow package is held in place by this thing called a "Push Pin Zip Tie." If you’ve ever tinkered with cars, you probably know what a plastic push pin looks like, especially if you've dealt with fender liners or door panels. Well, this one’s a bit different because it has a zip tie attached to it.
Now, this push pin is sitting in one of the holes you need to use for the upper bolt on the brake controller, and let me tell you, it’s a pain to get to. It’s really stuck in there! Luckily, I had a push pin removal tool at my disposal. Using just my sense of touch, I managed to get the fork of that tool under the push pin and yank it out. It took a few tries and a couple of colorful words, but I finally got it done. If you're curious, check out the video below to see what I mean!
This video shows what I could not see. You know how it goes—sometimes you just can’t fit your head into those tight spaces to see what’s actually happening. So, I ended up doing the whole installation by feel. It took a while and I was definitely sore from all the awkward contortions I had to do! But hey, that’s part of the fun, right? It can help answer questions you might have of you are doing this install or considering it. Check it out!

This Is A View Of Finished Install Of The Trailer Brake Control Module
The module is installed and bolted in the holes on the frame parts that is uses. In the process I dropped a nut and a socket and was unable to retrieve them. Good thing I had another 10mm nut in my miscellaneous parts bin. Mopar provides a "Stud Mounted Zip Tie" in the kit to go over the protruding threads that serves 2 purposes:
It protects the harness from getting damaged by the sharp threads.
It gives you a zip tie that holds the harness in place.


Summary of Steps Required To Install Trailer Brake Controller
Disconnect battery and be certain vehicle is de-energized (Critical Step)
Remove dashboard components.
Remove upper center instrument bezel.
Remove lower center instrument cluster.
Remove 12 volt outlet from lower center instrument cluster
Feed harness from trailer brake controller rheostat through dash to left side of vehicle
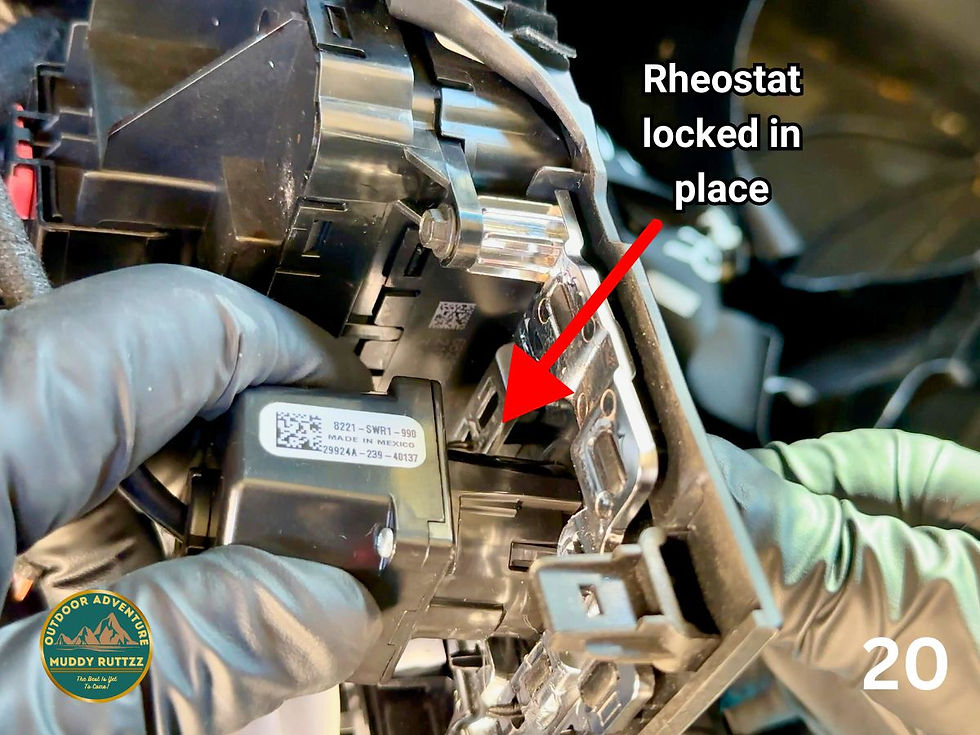
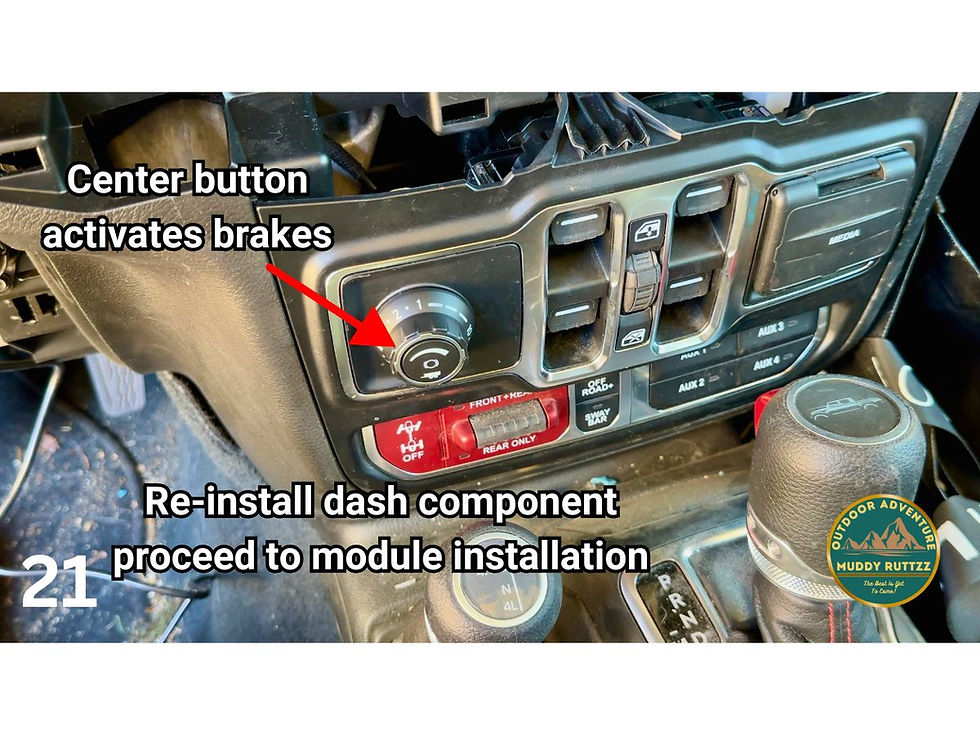
Install bezel, gain adjuster wheel, in lower center instrument cluster.
Install rheostat by attaching to back of bezel and adjuster wheel in lower center instrument panel.
Install trailer brake actuator button in center of gain adjuster wheel.
Reinstall lower center dash panel and upper center instrument cluster.
Locate Tow Package Harness Connector under left side of dash.
Connect Tow Package Harness Connector and Rheostat Harness Connector to Brake Controller Module.
Remove Push Pin Zip Tie from hole where upper bolt on Module will be inserted.
Install Module under left side of dash and fasten with supplied nuts.
Install Stud Mounted Zip Tie over upper module bolt and secure harness with zip tie.
Secure extra length of harnesses to vehicle to prevent damage.
Reinstall battery and test system by hooking up trailer.
Conclusion:
I Dreaded Doing This Brake Controller Install Because Of The Access: I Was Right To But I'm Glad It Is Done!
A Close Call in Santa Barbara
So, there I was, cruising through Santa Barbara, California, towing my Xventure Trailer. I hit a stoplight, applied the brakes, and—yikes!—I almost slid right through the intersection. It felt like there was some slippery stuff on the road, maybe a bit of water, but whatever it was, it definitely wasn’t a good vibe. At that moment, I didn’t have a trailer brake controller installed, so I was just relying on my Gladiator to handle the stopping for both itself and the trailer. Let me tell you, that little scare was enough to convince me it was time to get that controller installed.
Why Trailer Brakes Matter
When you’re off-roading, you often find yourself tackling steep hills, and having trailer brakes can really make a difference in safety when coming down those slopes. I believe the rules in California (but don’t quote me on this!) say that trailers over 2,000 lbs are required to have brakes. Looking back, I think it’s just smart to have trailer brakes on any trailer that comes equipped with them. After all, that’s what they’re there for, right? Better safe than sorry!
Thanks for checking out my article! I really appreciate you stopping by!
Merch Section
Support Muddy Ruttzz in Producing Quality Content. Use My Links. I will get a small commission when you do. (No extra cost to you.) Does not matter if you purchase the linked product I get credit for anything you purchase within 24 hours. Thanks!
Amazon Shopping
✅ - Mopar Trailer Brake Controller For Jeep Gladiator Wrangler J/L https://amzn.to/4gezv41 (Amazon)
✅ - Trailer Brake Controllers for all other vehicles https://amzn.to/4ge0gFA (Amazon)
✅ - Amazon Purchases - Use This Link To Shop On Amazon
✅ - Viair 400p Portable Compessor (Amazon)
✅ - Power Tank CO2 Tank w/mounting bracket (Amazon)
✅ - CO2 Tank by Preece Precision (Amazon)
✅ - Tire Deflation Tools - Large Variety and Types (Amazon)
DIY Parts For Building Your Own CO2 Tank Setup
✅ - 20lbs CO2 Tank w/Handle (Amazon)
✅ - High Flow CO2 Regulator 150psi (Amazon)
✅ - Deluxe High Flow CO2 Regulator w/Gauges (Amazon)
✅ - Viair Braided Coil Hose Inflator/Deflator (Amazon)
✅ - Co2 Tanks, Hoses, Regulators - Great Selection (Amazon)
✅ - Air Hose Fittings Variety (Amazon)
✅ - Amazon Purchases - Use This Link To Shop On Amazon
Ebay Shopping - Trailer Brake Controllers - Compressors -Parts For DIY - CO2 System and everything else!
✅ - Mopar Trailer Brake Controller For Jeep Gladiator Wrangler J/L https://ebay.us/1XC9M0 (eBay)
✅ - Trailer Brake Controllers for all other vehiclesn https://ebay.us/pKotYE (eBay)
✅ - Viair 400p Comressor from Summit Racing (eBay)
✅ - DIY CO2 Tank w/Handle (eBay)
✅ - Regulator For CO2 Tank (eBay)
✅ - Air Hose Fittings (eBay)
✅ - LifeStraw Water Filter (eBay)
✅ - Shop on eBay For Anything - Click Here!

Muddy Ruttzz Website Merch Page Click Here!
✅ - Zarges Aluminum Cases - Best Made Overlanding Storage Cases. When you require the best protection for you gear. Bear Resitant available. (Zarges)

✅ - MERCH - Great Muddy Ruttzz Clothing.
Click Here to See my Zarges Blogpost.
As a Amazon Affiliate and Ebay Partner I receive a commission if you use my links to make a qualifying purchase. It does not raise the price you pay.


