How to Install 3-Piece RJ45 Connectors: A Pro Guide for DIY Networking
- Muddy Ruttzz
- Feb 20
- 7 min read

If you’ve ever struggled with standard one-piece plugs, switching to 3-piece RJ45 connectors will be a total game-changer for your home office or media closet. After 40 years in the sheet metal trade, I’ve learned that having the right system is often better than having raw speed. I was forced to learn how to fabricate my own Ethernet connectors when I upgraded my home network, and my research showed me that these 3-piece systems gave me the best chance of success as well as great performance. You can see that full transformation in my article, How to Build a DIY 2.5Gbps Home Network and Tame Your Wiring Closet.
These three-part systems—consisting of the main housing, a spacer, and a loading bar—allow you to maintain the tightest possible twists in your Cat6 cable. Maintaining those twists is vital because data is like airflow in a duct; you want to minimize turbulence to reach those 2.5Gbps speeds. While many people search for "ethernet plug tutorials" or "how to crimp Cat6," using the specific 3-piece RJ45 connectors method ensures that even if you have carpal tunnel or blurry vision, you can achieve a professional-grade termination every single time without the frustration of wires slipping out of order.
Muddy Ruttzz Youtube Channel
My Articles and videos are unsponsored and all opinions are my own.
Support Us! Use my ✅ affiliate links from Amazon & eBay throughout and at the end of this article. I get a commission without any additional cost to you. You don't have to buy the listed product. I get credit if you click and purchase anything within 24 hours. Your support means the world to me! Learn More

Why 3-piece RJ45 connectors are the "Secret Sauce" for Home Networks
I DIY built a high-quality, high-speed network and transformed my messy structured media cabinet. You can see that process here in my article How to Build a DIY 2.5Gbps Home Network and Tame Your Wiring Closet.
My biggest challenge was installing connectors on the original tangle of Cat6 cables. I almost gave up, but these 3-piece RJ45 connectors were a total game changer. There was just no way I could get eight wires into a standard one-piece connector and through those tiny holes simultaneously.
Beyond being easier to handle, they have the added benefit of being technically superior. By using the internal spacer and load bar, the system keeps the wire twists incredibly close to the termination point. That is critical for maintaining signal integrity with the faster 2.5Gbps residential internet speeds now becoming available.
🛠️ Muddy Ruttzz Pro-Tip: The "Airflow" Rule > Coming from 40 years in the sheet metal trade, I always think of data like air moving through a duct. If you have gaps, sharp bends, or messy transitions, you get turbulence. That turbulence slows down your airflow—or in this case, your internet speed.Using 3-piece RJ45 connectors allows you to keep the cable twists tight right up to the pins. This minimizes "data turbulence" (crosstalk), ensuring your 2.5Gbps network runs as smooth and efficient as a perfectly balanced HVAC system. Don't let your data leak!
🛠️ Step-by-Step: The Retired Pro’s Guide to 3-Piece RJ45 Connectors


Phase 1: Preparation & The "Mobile Lab" Setup
Before touching the wires, set yourself up for success. In the sheet metal trade, we say the prep work is 90% of the job.
Don the "Nitrile Grippers": Put on nitrile gloves with grip texture. This gives you superior control over slick Cat6 strands and saves your fingertips from getting sore.
Adjust Your Vision: Put on your jeweler’s magnifier and turn on your LED headlamp. Proper lighting is the difference between a successful crimp and a wasted connector.
Slide the Boot: Slide the rubber strain-relief boot onto the cable first. If you forget this now, you’ll have to cut your finished work off later!


Phase 2: Stripping and The Spacer
Strip the Jacket: Use your wire stripper to remove about 1.5 inches of the outer jacket. Pro-Tip: Check the inner wires with your magnifier. If you see any nicks or scores, cut it off and start over.
Organize the Pairs: Arrange your four twisted pairs: Brown/White and Orange/White on the sides, Blue/White on top, and Green/White on the bottom.
Install the Spacer: Slide the first piece of the 3-piece RJ45 connectors—the spacer—down to the base of the jacket. Thread the orange and brown pairs through the side channels. This keeps the twists tight, which minimizes "data turbulence


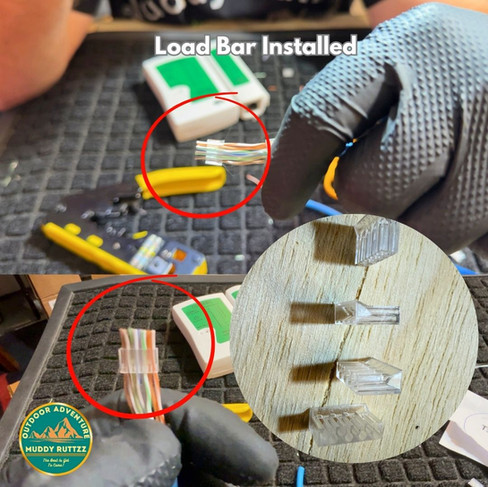


Phase 3: The Load Bar (The Secret Sauce)
Untwist and Flatten: Use a piece of scrap cable housing to help untwist the wires. Pull and curve them between your thumb and finger until they are perfectly straight. If they aren't straight, they won't go into the holes.
The T568B Sequence: Line the wires up in this order:
Orange-White, Orange, Green-White, Blue, Blue-White, Green, Brown-White, Brown.
Slide the Load Bar: Hold the load bar (wire guide) with the bevel facing up. Slide all eight wires through the tiny holes. Push it down until it meets the spacer.
The Flush Cut: Use high-quality flush cutters to snip the excess wire right at the edge of the load bar. You need a perfectly square, flat edge


Phase 4: The Final Crimp and Test
Insert into Housing: Slide the spacer and load bar assembly into the clear plastic connector housing. It should "click" or seat firmly against the front pins.
Crimp: Place the connector into your RJ45 crimping tool. Give it one solid, firm squeeze.
The Proof of Success: Plug both ends into your POE 300M tester. When you see all eight bars light up in sequence, you know you’ve got a pro-grade 2.5Gbps connection.
🛠️ Muddy Ruttzz Workbench Checklist: The Perfect Crimp
Print this out or keep it open on your tablet to ensure every 3-piece RJ45 connector is a winner on the first try.
1. The Prep Work
[ ] Don the Grippers: Put on your nitrile gloves for grip and protection.
[ ] Eyes and Light: Turn on your LED headlamp and have your jeweler’s magnifier ready.
[ ] The "Golden Rule": Slide the rubber boot onto the cable first.
2. The Internal Assembly
[ ] The Nick Test: After stripping the jacket, check every wire with your magnifier. If you see a nick, cut and restart.
[ ] Seating the Spacer: Slide the spacer (Piece 1) all the way down to the jacket.
[ ] Order of Operations: Arrange wires into the T568B pattern (Orange/White to Brown).
[ ] The Load Bar: Slide the wires through the 8-hole loading bar (Piece 2).
3. The Final Crimp
[ ] The Flush Cut: Trim the wires exactly flush against the edge of the load bar.
[ ] Bottom Out: Push the assembly into the main housing (Piece 3) until it can’t go any further.
[ ] The Squeeze: Firmly cycle your RJ45 crimping tool.
[ ] The Final Verification: Plug into your POE 300M tester. 8 green bars? You’re in business.
🔧 The "Muddy Ruttzz" Shop Tools List
I used these specific tools in my Las Cruces studio to make this job easy on the eyes and hands. You can find the gear I use at the links below:
The Connectors: 3-Piece RJ45 Cat6 Connector Kit – Includes the critical spacer and load bar for 2.5Gbps speeds. (Amazon)
Vision Boost: Jeweler’s Magnifier with LED Headlamp – The "secret weapon" for seeing those tiny T568B color codes. (Amazon)
Hand Protection: Nitrile Gripper Gloves – High-dexterity gloves that make handling slick Cat6 strands much easier. (Amazon)
The Tester: POE 300M Network Tester – Simple, effective proof that your connection is solid. (Amazon)
Precision Cutting: Micro Flush Cutters – Essential for getting that square cut against the load bar. (Amazon)
Conclusion: Precision Leads to Performance
I know it might seem impossible to get those eight tiny wires into those eight tiny holes—at least until you try this system. In the sheet metal trade, we never forced a fitting; we adjusted the prep work until the pieces clicked together. It’s the same here. Once you see that load bar slide into place and the tester lights up green, you’ll realize that high-speed networking isn't just for the pros—it's for anyone with the right patience and the right gear.
Don't let a tangle of wires slow down your home. Take it one step at a time, use your magnifiers, and keep those twists tight. You’ve got this!
📺 Watch the Full Build on Muddy Ruttzz
Want to see these 3-piece RJ45 connectors in action? I filmed the entire process in my Las Cruces studio so you can see exactly how I handle the wires and seat the load bar.
While you're there, please Subscribe and hit the notification bell! Your support helps me keep creating unsponsored, honest DIY content for the Muddy Ruttzz community.
Muddy Ruttzz is a retired sheet metal worker with a lifetime of adventures and DIY projects under his belt. A tech enthusiast originally from Silicon Valley and now living in Las Cruces, New Mexico, he specializes in simplifying complex home projects through his unique "Pro-Trade" perspective. Whether he's wiring a 2.5Gbps network or maintaining a Jeep in his garage studio, his goal is to help you get professional results without the frustration.
#Cat6 #NetworkingTips #DIYHomeNetwork #MuddyRuttzz #RJ45 #TechForSeniors #HomeAutomation #EthernetCable #3PieceConnector
Merch Section
Netgear Nighthawk CM3000 Modem – Certified for Xfinity "Next Gen" enhanced upload speeds.
Arris SURFboard S33 Modem – High-performance DOCSIS 3.1 with a 2.5Gbps port.
TP-Link Omada ER707-M2 Router – Multi-Gigabit VPN router with dual 2.5G ports.
TP-Link DS108G-M2 Switch – 8-Port 2.5Gbps unmanaged desktop switch.
TP-Link Archer AXE7800 (AXE95) – Tri-Band Wi-Fi 6E router for use as a dedicated Access Point.
Tools & Accessories
Solsop Pass-Through RJ45 Crimp Tool Kit – Includes the crimper and the POE 300M tester.
j5create USB-C to Ethernet Adapter – Essential for getting 2.5Gbps speeds on a Mac Mini.
12-Outlet Surge Protector – Ideal for managing bulky power bricks and reducing cabinet heat.

✅ - Zarges Aluminum Cases - Best Made Overlanding Storage Cases. When you require the best protection for you gear. Bear Resitant available. (Zarges)

✅ - MERCH Availabe on Spreadshop - Awesome Original Design Shirts and Merch - Muddy Ruttzz Clothing.
Click Here to See my Zarges Blogpost.
Affiliate Disclosure
As a Amazon Affiliate and Ebay Partner I receive a commission if you use my links to make a qualifying purchase. It does not raise the price you pay.


