DIY: How to Change Dual Washer Valve for a Leak-Free Laundry Room
- Muddy Ruttzz
- Nov 5, 2025
- 6 min read
The Importance of Changing a Leaky Washing Machine Valve
A leaky washing machine valve is more than just an annoying drip—it's a potential flood hazard. In our case, a seemingly simple dual washing machine valve was dripping, even when turned off, indicating worn-out internal seals and gaskets. If you're experiencing a similar issue, replacing the valve is a straightforward DIY plumbing job that can save you from significant water damage. This step-by-step guide will walk you through the process, including key preparation and essential tips for success.
Muddy Ruttzz Youtube Channel
This Article and Video is unsponsored and all the gear, tools & parts I purchased myself.
Check Out My Youtube Video On This Subject Here
Support Us! Use my ✅ affiliate links throughout and at the end of this article. You don't have to buy the listed product. I get credit if you click and purchase anything within 24 hours. Your support means the world to me! Learn More
Preparation: Tools and Water Shutoff
Before starting any plumbing job, preparation is crucial. This not only ensures a smooth process but also minimizes the time the water must remain off.
Necessary Tools and Supplies For A Dual Washer Valve Change Out
While every job is different, here are the tools that proved helpful for this dual washer valve change:
New Dual Washing Machine Valve: Ensure it is compatible with your existing fittings.
Stubby Screwdriver (e.g., 5-in-1 multi-bit): Useful for tight spaces inside the laundry alcove.
Ratcheting Multi-Bit Tool with 90° Angle: Excellent for screws that are hard to reach directly.
Channel Locks or Adjustable Wrench: To remove the old washing machine hoses.
Bucket and Towels: To catch any residual water once the old valve is disconnected.


Critical First Step: Locating and Turning Off the Water
The most vital step is shutting off the main water supply. In a condominium or multi-unit building, this means communicating with your neighbors and locating the building's main water shutoff.
Pro Tip: In a multi-unit dwelling, shutting off the water affects everyone. Always notify your neighbors or building management beforehand to prevent inconvenience and coordinate the best time for the repair.
Once the main water is off, open the faucets in the lower parts of the building or home to relieve pressure and drain the lines before proceeding to change dual washer valve.

The Valve Replacement Process: Step-by-Step
With the water supply secured, it's time to tackle the replacement.
Disconnecting the Old Valve
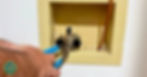
1) Remove Caps: Use channel locks or a wrench to carefully remove the caps (or washing machine hoses) from the leaking valve. Be ready with the bucket, as residual water will still drain out.


3) Slide Off the Old Valve: Once the screws are out, the old valve body should slide off the existing pipe fittings (usually threaded couplings that remain soldered to the pipes).
4) Inspect O-Rings: Check the exposed pipe fittings for the old O-rings. They are critical for the seal. Remove any old, worn O-rings.
Removing Parts Not Needed For This Repair From The New Dual Washing Machine Valve

I decided not to replace the part of the valve that threads into the existing pipe inside the wall. Those were not leaking. So I removed that part from the new valve because it would not be needed. If this was a new install I would have had to solder threaded female fittings onto pipes in the wall. We also found out the threads were different on the existing valve and the new valve. We were able to reuse the old hold down screws to install the new valve.
Replacing your washing machine valve? Might as well replace the hoses too!

Installing the New Valve
1) Apply New O-Rings: The new valve will likely come with new O-rings for the threaded pipe fittings. Carefully place these new O-rings onto the existing fixed fittings.

2) Mount the New Valve Body: Position the new dual washer valve over the fittings, ensuring the hot and cold connections align.
Secure with Screws: This is a crucial step! It is possible the new mounting screws have a different thread pitch than the old fittings.
Test Fit: Gently attempt to start the new screws. If they don't thread easily, immediately stop.
Swap Components: In our case, the new screws were incompatible. We successfully used the old screws with the new O-rings (removed from the new screws) to secure the valve. This ensured a proper thread while using fresh sealing components.

3) Tighten Carefully: Hand-tighten the screws, making sure not to cross-thread them. Over-tightening can damage the new O-rings or the plastic components. Once your are shure the screws are not cross threaded tighten them up.

Final Test and Restoration
After the new valve is mounted and secured, it’s time for the moment of truth.
Turn Water Back On: Have a spotter ready inside the laundry room as you, or your helper, restore the main water supply.
Check for Leaks: Watch the newly installed valve closely for drips or leaks. You will know quickly once the pressure builds up.
Test Operation: Once you confirm no leaks at the valve body, test the new on/off levers and check the water flow by briefly turning the water on through the valve.
Restore Hot Water: If you shut off the hot water heater during the process, be sure to turn it back on.

When your sure there are no leaks and everything is working install your washer back in place. Now your ready to do some laundry!
Conclusion:
Successfully learning how to change dual washer valve components is a rewarding and necessary home maintenance skill. By taking the time to properly shut off the water, use the correct tools, and adjust for small hiccups like incompatible screws, you can easily replace a dripping valve. Using new sealing components on reliable old fasteners ensured a perfect, leak-free connection. Now, the laundry room is safe, dry, and ready for use!
Call to Action
Did this guide help you fix your leaky valve? Let me know in the comments below! Don't forget to check out the full video for a visual walkthrough and more helpful DIY tips on the Muddy Ruttzz Youtube channel.
#DIYPlumbing #WashingMachineRepair #HomeMaintenance #ChangeDualWasherValve #StopTheDrip #LaundryRoomFix
Merch Section
Support Muddy Ruttzz in Producing Quality Content. Use My Links. I will get a small commission when you do. (No extra cost to you.) Does not matter if you purchase the linked product I get credit for anything you purchase within 24 hours. Thanks!
Amazon Shopping
✅ - Dual Washing Machine Valves https://amzn.to/3JMIAH1 (Amazon)
✅ - Channel Lock Plier Set https://amzn.to/47rDxVF (Amazon)
✅ - Plumbing Hand Tools https://amzn.to/3XdqRvv (Amazon)
✅ - Washing Machine Hoses https://amzn.to/4qFNNRL (Amazon)
✅ - Use This Link To Shop On Amazon (https://amzn.to/4hinMDx)
✅ - Dana Performance Diff Cover Wrangler JL Gladiator JT - https://ebay.us/DlpfWm
✅ - Amasoil 75-90 Differential Fluid - https://ebay.us/jW9jka (eBay)
✅ - Reinzosil Universal RTV - https://ebay.us/dv3vWr (eBay)

✅ - Zarges Aluminum Cases - Best Made Overlanding Storage Cases. When you require the best protection for you gear. Bear Resitant available. (Zarges)

✅ - MERCH Availabe on Spreadshop - Awesome Original Design Shirts and Merch - Muddy Ruttzz Clothing.
Click Here to See my Zarges Blogpost.
As a Amazon Affiliate and Ebay Partner I receive a commission if you use my links to make a qualifying purchase. It does not raise the price you pay.


