Bombproof Your Dana Diff: Spicer Performance Differential Cover Installation
- Muddy Ruttzz
- Oct 26, 2025
- 7 min read

Why the Differential Cover is Your Jeep's First and Most Important Mod
If you own a Jeep Gladiator or Wrangler and you’re hitting the trails—especially the rocky terrain we have right here in Las Cruces, New Mexico—the single most important modification you can make is an upgraded differential cover.
No, this video/post isn't sponsored—I bought all this gear with my own hard-earned money!
The factory cover is thin stamped steel, and it offers about as much protection as a wet paper towel against a sharp rock. A busted differential on the trail can end your adventure fast and leave you with a massive repair bill. That's why installing a heavy-duty, cast iron cover is a non-negotiable step for any serious off-roader. It’s an easy, high-value DIY project that offers serious protection for your rig.
Muddy Ruttzz Youtube Channel
Check Out My Youtube Video On This Subject Here
Support Us! Use my ✅ affiliate links throughout and at the end of this article. You don't have to buy the listed product. I get credit if you click and purchase anything within 24 hours. Your support means the world to me! Learn More
Getting Familiar with the Dana/Spicer Differential Cover
There are a lot of great covers out there, but today we’re talking about the Dana/Spicer Advantek Performance Front Differential Cover (Part #10044799). This part fits the Dana 44 M210 axles found on the Jeep Gladiator (JT) and the Jeep JL Wrangler.
I chose the Dana/Spicer Differential Cover for a few simple reasons: it’s reasonably priced, and who knows your axle better than the guys who built it?


The Key Features of the Spicer Advantek Cover
Bombproof Material: It's made from thick Nodular Iron, which is exponentially stronger than the stock stamped steel.
Protection & Cooling: The design includes fins that not only add strength and provide a bit of cooling but also act as integrated sliders to prevent you from getting hung up on rocks. They also protect the bolt heads from being sheared off.
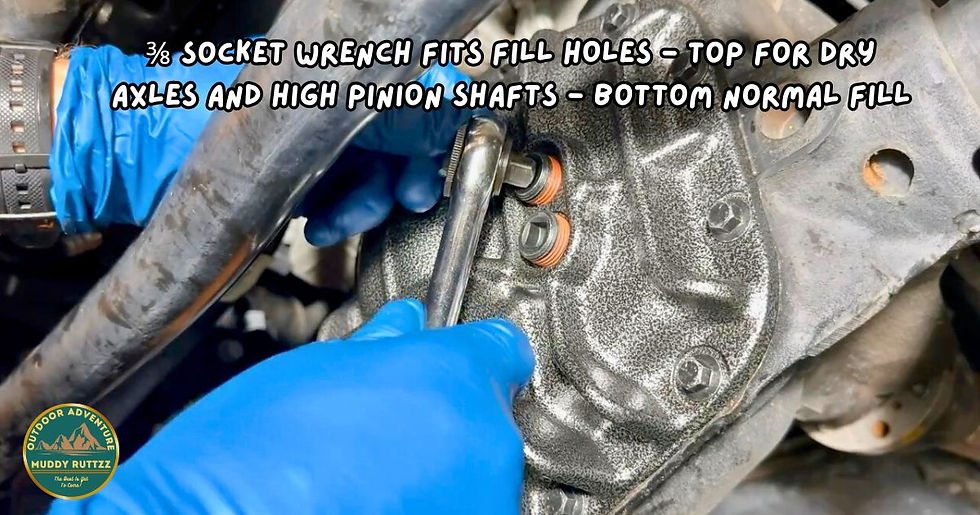
Dual Fill Holes: You’ll notice two fill holes. I'll be using the bottom one. The top hole is primarily for high-pinion angle driveshafts or when filling a completely dry axle assembly


How Do You Install The Spicer Diff Cover? I'll Show You
I'm lucky that I've already installed a 2-inch lift on this Gladiator, giving me plenty of elbow room underneath. This job is a piece of cake for a retired sheet metal worker like me, and it will be for you too.
Loosen the bolts on the OEM cover to let the old differential fluid drain out into a pan.
Once the fluid is out, remove the rest of the bolts and take the old cover off.
You'll see the OEM cover uses a reusable gasket. The new Spicer cover does not use this—we're ditching it for RTV sealant.


Prepping the Gasket Flange: Make it Smooth as Silk
This is the most critical step that separates a rushed job from a pro-level install. The surface on the axle housing where the cover bolts up is called the Gasket Flange or Mating Surface.
Cleanliness is Key: Scrape off any old gasket material or crud.
Smooth it Out: If you see any paint or burrs, smooth them out. The area you really care about is the part of the flange inside the bolt holes. This surface needs to be absolutely smooth as silk to ensure a perfect seal.

Prepping the New Cover and Applying Reinzosil RTV
Degrease: Hit the flange of the new diff cover with some Brake Clean to degrease it. This is a must!
Apply the Sealant: Reinzosil is amazing stuff that replaces countless other silicones, but it stinks and the warnings are real! Use it in a well-ventilated area (like my new garage studio!) and avoid skin contact.
The Bead: Apply a nice, consistent bead of RTV around the inside of the bolt holes on the new cover's flange. Do not spread it around or go outside the bolt holes.
Work Quickly (but Carefully!): You have about 5 to 15 minutes before the Reinzosil starts to skin over.


More information on Reinzosil Here: https://victorreinz.us/products/reinzosil-rtv-silicone

Bolt Up and Torque Specs
I had everything lined up to prevent any delay.
Careful Placement: Gently place the new cover onto the axle housing. Try to move it as little as possible to give the RTV the best chance of sealing properly.
Snug It Down: Snug all the bolts using an impact gun in a criss-cross pattern.
Torque Time: Finish them off with a torque wrench. You only need 25 to 30 foot-pounds (ft-lbs) of torque. Don't overdo it!


The Waiting Game: Cure Time and Fluid Fill (Wait Time Till Fluid Fill)
That’s it for now—time to put the tools down. The Reinzosil needs time to cure:
Functional Seal: It needs 4–6 hours to reach a "functional seal," which means we absolutely cannot add the diff fluid until then.
Full Cure: A full cure takes 25 to 100 hours, depending on conditions. I’ll be back in the morning to add the fluid.
Adding the Fluid
I’m a big fan of AMSOIL Differential Fluid. It’s a great product, made in the USA, and it already contains the limited-slip additives if your application requires them. I also love that it comes in these handy pouches that make pouring it into the diff filler hole a breeze.
Fill Point: Use the bottom fill hole on the new Spicer cover and fill it up until the fluid level is just slightly below the fill hole opening.

Conclusion
Now your Jeep’s front driveline is protected by a genuine, bombproof Dana/Spicer Differential Cover. You’ve traded that flimsy stock piece for a nodular iron shield, and you did it all yourself right here in your garage. Not only did you save money, but you learned a new skill and increased your confidence for the next trail challenge! That’s what DIY off-roading is all about.
Call to Action
If this guide helped you conquer your diff cover installation, let me know in the comments!
Ready for your next project? Browse the MuddyRuttzz.com blog for more DIY maintenance and modification articles. And, of course, be sure to head over to the Muddy Ruttzz YouTube Channel and subscribe—you can watch the full video version of this install and see how the new cover handles the New Mexico desert! See our Ouray Jeep Jamboree Adventure!
#jeepmod #DanaSpicer #OffRoad #JeepGladiator #JeepWrangler #DifferentialCover #DIYJeep #JeepLife #NewMexicoJeep #MuddyRuttzz
Merch Section
Support Muddy Ruttzz in Producing Quality Content. Use My Links. I will get a small commission when you do. (No extra cost to you.) Does not matter if you purchase the linked product I get credit for anything you purchase within 24 hours. Thanks!
Amazon Shopping
✅ - Spicer Performance Front Diff Cover Wrangler JL & Gladiator JT - https://amzn.to/4ocAUgm (Amazon)
✅ -Spicer Performance Rear Diff Cover Wrangler JL & Gladiator JT- https://amzn.to/431vEng (Amazon)
✅ - Reinzosil Universal RTV - https://amzn.to/4qyg3FS (Amazon)
✅ - Amsoil differential fluid 75w-85 - https://amzn.to/47jOb0J (Amazon)
✅ - Use This Link To Shop On Amazon (https://amzn.to/4hinMDx)
✅ - Dana Performance Diff Cover Wrangler JL Gladiator JT - https://ebay.us/DlpfWm
✅ - Amasoil 75-90 Differential Fluid - https://ebay.us/jW9jka (eBay)
✅ - Reinzosil Universal RTV - https://ebay.us/dv3vWr (eBay)

✅ - Zarges Aluminum Cases - Best Made Overlanding Storage Cases. When you require the best protection for you gear. Bear Resitant available. (Zarges)

✅ - MERCH Availabe on Spreadshop - Awesome Original Design Shirts and Merch - Muddy Ruttzz Clothing.
Click Here to See my Zarges Blogpost.
As a Amazon Affiliate and Ebay Partner I receive a commission if you use my links to make a qualifying purchase. It does not raise the price you pay.


